Best at-home manicure tools can help you create cleaner, smoother and longer-lasting nails without depending on a salon appointment every time. The real difference is not buying every beauty gadget available, but choosing tools that make filing, shaping, cuticle care, polish application and cleanup easier to control.
A salon-quality manicure at home starts with preparation. Even expensive polish can look uneven if the nail edge is rough, the cuticle area is dry, or the nail plate has oil and dust on it. For beginners, the safest approach is to build a simple kit first and add advanced tools only when the basic routine feels comfortable.
Many people focus only on nail color, but the tools used before and after polish matter just as much. A good file, buffer, cuticle pusher, base coat, clean-up brush and quick-dry top coat can make regular nail polish look more polished and professional.
Gel tools, electric files and nail lamps can be useful, but they require more care. Used incorrectly, they may weaken the nail, irritate the skin or make removal harder than necessary. That is why this guide explains what each tool does, when it is worth buying and what mistakes to avoid.
By the end, you will know how to choose a practical at-home manicure kit, which tools are essential, which ones are optional and when it is safer to see a licensed nail technician or dermatologist instead of trying to fix a nail problem alone.
Important note: nail tools should be used gently, cleanly and according to product directions. Do not cut live skin, force off gel polish, use damaged electrical tools or ignore pain, swelling, bleeding, discoloration or signs of infection around the nails.
Essential At-Home Manicure Tools for Salon-Quality Nails
The best at-home manicure tools are the ones that help you shape, smooth, clean and protect the nails without causing unnecessary damage. A basic kit should not feel complicated. In many cases, a beginner can get better results from a few well-chosen tools than from a large set filled with items they do not know how to use.
Start with nail clippers, a glass or fine-grit nail file, a gentle buffer, a cuticle pusher, cuticle oil, base coat, polish, top coat, a small clean-up brush and nail polish remover. These tools cover the full manicure process from trimming to finishing.
For regular polish, you do not need a curing lamp. For gel polish, you need a compatible lamp, gel base coat, gel color, gel top coat and proper removal supplies. The safest choice depends on your experience, how often you do your nails and whether your nails are already thin, peeling or sensitive.
| Tool | Main purpose | Important care tip |
|---|---|---|
| Nail clipper | Shortens nails before shaping | Clip small sections instead of cutting across too aggressively. |
| Glass nail file | Smooths and shapes the nail edge | Use gentle strokes and avoid sawing hard back and forth. |
| Buffer block | Smooths surface ridges lightly | Use rarely and gently to avoid thinning the nail plate. |
| Cuticle pusher | Pushes back softened cuticle area | Do not scrape deeply or cut living skin. |
| Cuticle oil | Hydrates nails and surrounding skin | Apply after polish dries or on non-polish days. |
| Base coat | Helps protect the nail and improve polish grip | Use a thin layer and let it dry before color. |
| Top coat | Adds shine and helps reduce chips | Seal the free edge of the nail for better wear. |
How to Choose a Nail File, Buffer and Clippers
A nail file is one of the most important tools in an at-home manicure kit. For natural nails, a glass file or a fine-grit file is usually easier to control because it smooths the edge without shredding it. Very coarse files are better reserved for artificial enhancements, not thin or weak natural nails.
Clippers are useful when nails are long and need to be shortened before shaping. A common mistake is using the file to remove too much length, which takes longer and can create uneven pressure. Clip first, then refine the shape with a file.
Buffers should be used carefully. A buffer can remove slight unevenness and create a smoother polish surface, but heavy buffing can weaken the nail. If your nails already bend easily, peel or feel tender, skip aggressive buffing and focus on hydration, base coat and gentle filing instead.
- Choose a fine-grit or glass file for natural nails.
- Use clean, sharp clippers instead of dull tools.
- File in light strokes and avoid forcing the nail edge.
- Use a buffer only when the nail surface truly needs smoothing.
- Replace files that feel rough, dirty or worn out.
Cuticle Tools: What You Need and What to Avoid
Cuticle care can make a manicure look cleaner, but it is also one of the easiest areas to overdo. The cuticle area helps protect the nail from outside irritants. Cutting too much skin or pushing too hard can create small openings where irritation or infection may start.
For at-home use, the safest tools are cuticle oil, a softening product and a rounded cuticle pusher. After washing your hands or soaking briefly in warm water, gently push back only the softened excess around the nail plate. Do not dig under the nail fold or cut skin that is attached and healthy.
Cuticle nippers should be used with caution. They are best for removing a loose hangnail, not for cutting the entire cuticle line. In practice, many messy manicures happen because too much skin is removed before polish, leaving redness or uneven edges.
| Cuticle tool | Best use | What to avoid |
|---|---|---|
| Cuticle oil | Daily hydration and healthier-looking nail edges | Applying before polish without cleaning the nail plate afterward. |
| Wooden orange stick | Gentle pushing and polish cleanup | Pressing sharply into the skin. |
| Metal cuticle pusher | Controlled pushing on softened cuticles | Scraping hard over the nail surface. |
| Cuticle nipper | Trimming loose hangnails only | Cutting live skin around the entire nail. |
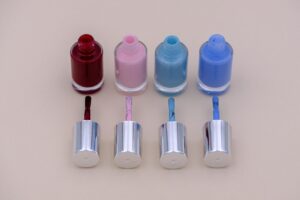
Polish Application Tools That Make Nails Look Professional
Professional-looking polish depends on thin layers, clean edges and patience. A base coat helps create a smoother surface, while a top coat adds shine and protection. The polish brush matters too: a wide rounded brush can make application easier for some people, while a thin brush gives more control on small nails.
A clean-up brush is one of the most useful tools for beginners. Dip a small angled brush in remover, remove excess liquid and clean around the sidewalls before the polish dries completely. This makes the final result look much cleaner even if your application is not perfect.
Another helpful tool is a nail polish holder or stand. It keeps the bottle stable and reduces spills. This is especially useful if you paint your nails on a small desk, bed tray or uneven surface.
-
Prepare the nail surface.
Wash and dry your hands, then remove old polish and oil from the nail plate. Polish does not last as well on a greasy or dusty surface.
-
Shape before polishing.
Clip if needed, then file the edge into your preferred shape. Avoid filing after polish because it can break the seal at the tip.
-
Apply a thin base coat.
Use a small amount and cover the nail evenly. A thick base can make polish bubble or dry slowly.
-
Use two thin color coats.
Thin coats dry better and look smoother than one heavy coat. Leave a small gap near the cuticle to prevent flooding.
-
Clean the edges.
Use a small brush with remover to tidy the sidewalls. Work carefully so you do not remove too much polish.
-
Finish with top coat.
Apply top coat over the color and lightly seal the free edge. This helps reduce early chipping.
-
Let the manicure set.
Even quick-dry polish needs time to harden fully. Avoid hot water, heavy typing and tight gloves right after painting.
Gel Manicure Tools: When They Are Worth It
Gel manicure tools can be worth it if you want a glossy finish that lasts longer than regular polish and you are willing to follow proper application and removal steps. A gel kit usually includes a curing lamp, gel base coat, gel color, gel top coat, lint-free wipes and remover supplies.
The curing lamp must match the gel system you are using. Not every lamp cures every gel product correctly. If gel is under-cured, it may lift, wrinkle, feel sticky or increase the chance of irritation. For beginners, it is safer to use products from the same system instead of mixing random gels and lamps.
Gel removal is where many people damage their nails. Peeling, scraping or forcing gel off can remove layers of the natural nail. If you choose gel, make sure you also buy proper removal supplies, including acetone, foil or nail clips, cotton pads, a gentle file and cuticle oil.
Gel safety reminder: protect the skin around your hands from unnecessary UV exposure, follow curing times carefully and stop using a product if you notice burning, itching, swelling, rash or pain.
Electric Nail Files and Drill Bits: Useful but Not Essential
An electric nail file can speed up product removal and shaping, especially for gel extensions, acrylics or builder gel. However, it is not essential for a basic at-home manicure. For natural nails, a manual file is usually safer and easier to control.
The biggest risk with electric files is removing too much nail too quickly. High speed, heavy pressure or the wrong bit can create heat, grooves and thinning. Beginners should avoid using a drill on the natural nail plate unless they have proper training and understand pressure, speed and bit choice.
If you still want an electric file, choose one with adjustable speed, low vibration and beginner-friendly bits. Practice on artificial practice tips before using it on your own nails. When in doubt, use it only for light surface work on product, not on the natural nail.
| Tool level | Who it suits | Risk level |
|---|---|---|
| Manual file | Beginners and natural nail care | Low when used gently |
| Buffer block | Occasional smoothing before polish | Medium if used too often |
| Electric file | Experienced users or enhancement removal | Higher if used without training |
| Professional drill bits | Advanced gel, acrylic or salon work | High if used incorrectly |
Sanitation Tools and Storage for a Safer Manicure Kit
Clean tools are part of a salon-quality result. Even at home, nail dust, old polish and skin debris can build up on tools. Clippers, pushers and nippers should be cleaned after use and stored dry. Files and buffers should be replaced when they become worn, dirty or difficult to clean.
You do not need complicated salon equipment for personal use, but you should avoid sharing tools that touch skin or nails unless they can be properly cleaned. If a tool becomes rusty, loose or damaged, replace it. A damaged nipper or clipper can pull skin instead of cutting cleanly.
A small storage case also helps. Keep sharp tools capped, keep liquids away from heat, and store polish bottles upright. Nail polish remover and some nail products can be flammable, so they should not be used near candles, cigarettes, hot tools or open flames.
- Wash hands before starting your manicure.
- Clean metal tools after each use and dry them fully.
- Do not share cuticle nippers or tools that may touch broken skin.
- Replace disposable files and buffers regularly.
- Keep remover, primer and polish away from heat sources.
- Store tools in a clean, dry case instead of loose in a drawer.
Common Mistakes That Ruin an At-Home Manicure
One common mistake is applying polish too thickly. Thick coats may look faster at first, but they dry slowly, dent easily and can peel in sheets. Thin layers give a smoother finish and usually last better.
Another mistake is skipping nail preparation. If the nail plate has lotion, cuticle oil, dust or old polish residue, the new polish may not grip well. Clean preparation is especially important for gel polish because poor adhesion can lead to lifting.
Over-buffing is also a problem. A smooth surface helps polish, but a thin nail is more likely to bend and peel. If your nails feel warm, sore or flexible after buffing, you are probably doing too much.
| Mistake | What can happen | Better approach |
|---|---|---|
| Painting over oily nails | Polish lifts or chips early | Clean the nail plate before base coat. |
| Cutting cuticles aggressively | Irritation, redness or infection risk | Push gently and trim only loose hangnails. |
| Using thick polish layers | Bubbles, dents and slow drying | Apply two or three thin coats. |
| Peeling off gel polish | Natural nail layers may be damaged | Soak and remove according to product directions. |
| Using an electric file too strongly | Heat, grooves or nail thinning | Use low speed, light pressure or choose a manual file. |
When to Buy Professional Tools and When to Keep It Simple
Professional tools are not always better for home use. A salon-grade electric file, acrylic brush or builder gel system can give excellent results in trained hands, but it can also create problems if the user does not understand the technique.
Keep it simple if your goal is clean natural nails, occasional polish or beginner-friendly nail care. A high-quality file, base coat, top coat, clean-up brush and cuticle oil are enough for a neat routine. Add gel tools only when you are ready to learn proper curing and removal.
Before spending more money, ask what problem you are trying to solve. If your polish chips because your nails are oily before application, a better lamp will not fix it. If your cuticles look dry, an expensive drill is not the answer. Often, small technique improvements make the biggest difference.
- Buy basic tools first if you are new to manicures.
- Upgrade only when a tool solves a real problem.
- Avoid professional-only products unless you understand the risks.
- Do not buy a full gel system if you are not ready for careful removal.
- Choose comfort, safety and control over speed.
When to See a Professional Instead of Doing It Yourself
At-home manicure tools are for beauty maintenance, not for treating medical nail problems. If you notice pain, swelling, bleeding, dark streaks, nail separation, sudden thickening, unusual discoloration or a nail that stops growing normally, it is safer to contact a healthcare professional or dermatologist.
You should also consider a licensed nail technician if you want acrylic extensions, complex gel extensions, builder gel, major repair work or safe removal of stubborn product. These services require more skill than regular polish and can damage natural nails when done incorrectly.
If a product burns, causes itching or creates a rash, remove it safely if possible and stop using it. Reactions can happen with nail cosmetics, adhesives, primers and gel products. Do not keep applying the same product hoping your skin will get used to it.
Conclusion
Best at-home manicure tools are not about owning the largest kit. They are about choosing safe, useful items that help with shaping, preparation, polish application, cleanup, hydration and gentle removal.
For most beginners, the strongest starting kit includes clippers, a fine file, a gentle buffer, cuticle oil, a cuticle pusher, base coat, top coat, polish remover and a clean-up brush. Gel lamps, electric files and advanced systems can be added later, but only with proper care and realistic expectations.
If your nails hurt, change color, separate, swell or react badly to a product, stop the manicure routine and seek qualified help. A beautiful manicure should never come at the cost of damaged skin, painful nails or unsafe tool use.
FAQ
1. What are the most important at-home manicure tools for beginners?
The most important tools are nail clippers, a fine-grit or glass file, a gentle buffer, cuticle oil, a cuticle pusher, base coat, polish, top coat, nail polish remover and a small clean-up brush. These items cover the basic steps: trimming, shaping, preparing, painting and finishing. Beginners should avoid buying advanced tools before learning the basics because too many products can make the routine confusing. A simple kit used correctly usually gives better results than a large kit used with poor technique.
2. Do I need a UV or LED lamp for salon-quality nails at home?
You only need a UV or LED lamp if you are using gel polish that requires curing. Regular nail polish does not need a lamp and should be dried naturally or with a regular drying method. A lamp can help gel polish last longer, but it also requires correct curing times, compatible products and careful removal. If you are new to manicures, regular polish is often the easier and safer place to start before moving into gel systems.
3. Is a glass nail file better than a regular emery board?
A glass nail file is often a good choice for natural nails because it can smooth the edge gently and may last longer when cleaned properly. Emery boards can also work well, especially if they are fine-grit and used with light pressure. The main issue is not only the material, but how the file is used. Filing too aggressively, using a very coarse file or forcing the edge can leave nails rough, weak or more likely to split.
4. How often should I buff my nails?
Buffing should be occasional, not a daily habit. A buffer removes a small amount from the nail surface, so using it too often can make nails thinner and more flexible. If your nails already peel, bend or feel sensitive, skip heavy buffing. For most at-home manicures, a light smoothing only when needed is enough. The goal is to create a clean surface for polish, not to erase every natural ridge completely.
5. Should I cut my cuticles at home?
It is usually safer not to cut the full cuticle area at home. The skin around the nail helps protect the area from irritation and germs. Instead, soften the area, gently push back excess cuticle and use cuticle oil regularly. If you have a loose hangnail, trim only the loose piece with a clean, sharp nipper. Do not cut attached skin or continue if the area becomes painful, red or swollen.
6. What tool helps most with messy polish edges?
A small clean-up brush is one of the best tools for messy polish edges. After applying polish, dip the brush lightly in nail polish remover, wipe off excess liquid and carefully clean around the sidewalls and cuticle line. This creates a more professional-looking finish without needing perfect brush control. A wooden orange stick can also help remove small polish mistakes, especially when wrapped with a little cotton.
7. Are electric nail files safe for home manicures?
Electric nail files can be safe when used correctly, but they are not necessary for basic natural nail manicures. They remove product quickly, which means they can also remove too much nail quickly. Beginners should use low speed, light pressure and avoid drilling the natural nail plate. If you only use regular polish, a manual file is usually enough. Electric files are better suited for users who understand gel, acrylic or enhancement removal.
8. What is the best way to make regular polish last longer?
Prepare the nail plate well, use thin coats and seal the free edge. Start by removing oil, dust and old polish. Apply a thin base coat, two thin color coats and a quality top coat. Avoid flooding the cuticle area because polish on skin can lift faster. After painting, avoid hot water, heavy cleaning and pressure on the nails while the polish fully sets. Reapplying top coat after a few days can also help maintain shine.
9. What should I avoid when using gel polish at home?
Avoid mixing random gel products and lamps, curing for less time than directed, touching uncured gel on the skin and peeling gel off when it starts lifting. These mistakes can lead to poor wear, irritation or nail damage. Always follow the product instructions and remove gel gently with the correct method. If gel causes burning, itching, rash, swelling or pain, stop using it and consider asking a professional for guidance.
10. How do I keep my manicure tools clean?
After each manicure, remove visible dust and product from tools. Wash and dry metal tools carefully, and store them in a clean case. Disposable files and buffers should be replaced when worn or dirty. Do not share tools that touch skin, especially cuticle nippers, unless they can be properly cleaned. Keeping tools dry is also important because moisture can encourage rust or contamination. Clean tools help reduce irritation and make the manicure process more controlled.
11. Which tools are optional for an at-home manicure kit?
Optional tools include a nail polish holder, dotting tools, nail art brushes, stamping plates, silicone mats, electric nail files and gel lamps. These can be fun and useful, but they are not required for a clean manicure. Buy optional tools only when you know what result you want. For example, a clean-up brush improves basic polish application, while a stamping kit is mainly for decoration. Prioritize useful basics before creative extras.
12. When should I stop doing my nails at home and see a professional?
Stop and seek help if you notice pain, swelling, bleeding, pus, a dark streak, nail separation, sudden thickening, strong discoloration or a product reaction that does not settle. You should also see a licensed nail technician for complex acrylics, builder gel, extensions or difficult product removal. At-home tools are helpful for maintenance, but they are not meant to treat nail disease, serious irritation or damage caused by improper removal.
Editorial note: This article is for educational purposes and does not replace advice from a licensed nail technician, dermatologist or healthcare professional when there is pain, infection, allergic reaction, nail separation or persistent nail changes.
Official References
- U.S. Food and Drug Administration — Nail Care Products
- Mayo Clinic — Fingernails: Do’s and don’ts for healthy nails
- American Academy of Dermatology — Tips for Healthy Nails

Nora Ashford is a licensed nail technician and beauty educator with over 12 years of hands-on experience in professional nail care, product formulation, and salon hygiene. She began her career working in high-end nail studios across London and New York before transitioning into content creation to help people make informed, safe choices about their nail health and beauty routines.
Her work focuses on translating complex nail science into practical, easy-to-follow advice. She regularly reviews nail products, tests application techniques, and shares evidence-based tips on everything from cuticle care to gel safety.
Nora believes that beautiful nails should never come at the cost of nail health, and she is committed to helping readers achieve salon-quality results responsibly.